I can hear the groans already: “Not another rubric pusher! Enough with this cockamamie writing-instructor stuff!” But I am neither a traditional rubric pusher nor a writing instructor. Instead, I am an art historian who had never graded successfully with rubrics before trying them out in Canvas—and now I absolutely swear by them for Canvas grading of written assignments and examinations. I have found that rubrics allow me to do the following:
- Provide students with clear expectations as they prepare their assignments and examinations
- Grade written work in a more consistent manner
- Grade written work more rapidly
- Devote more time to individualized feedback
In this blog post, I’ll lay out some basics about working with rubrics in Canvas: How to build them, how to copy and customize them, and how to use them with the SpeedGrader, regardless of whether you are grading items submitted in person or on line, or even items, like participation, with no submissions.
Before You Build Your Rubric
Think carefully about how many total points you want to award, about the relative importance of different components of the paper and of the contents of the paper versus its mechanics, and about how microscopic you want your analysis to be. For short, low-stakes assignments or for very focused tasks, simpler is better; for examinations or complex pieces of technical writing, e.g. lab reports, a more rigidly structured and detailed rubric may be warranted. Rubrics can also be used to grade items submitted in paper, or even items without any submissions, such as participation.
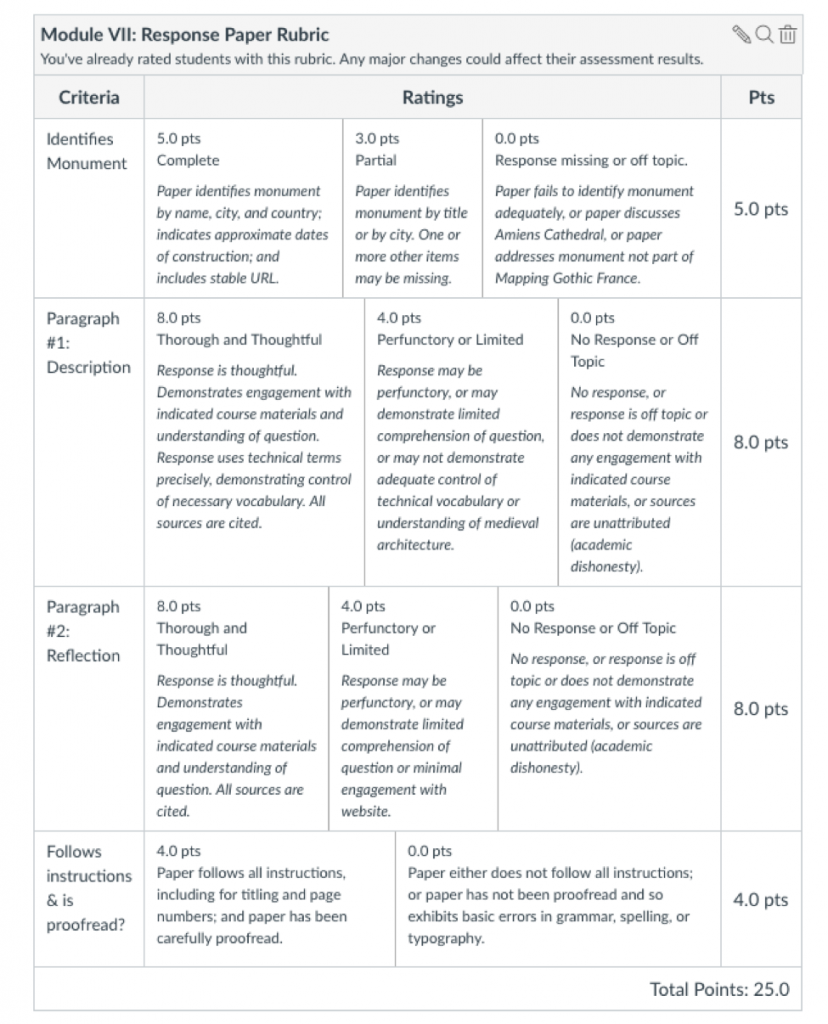
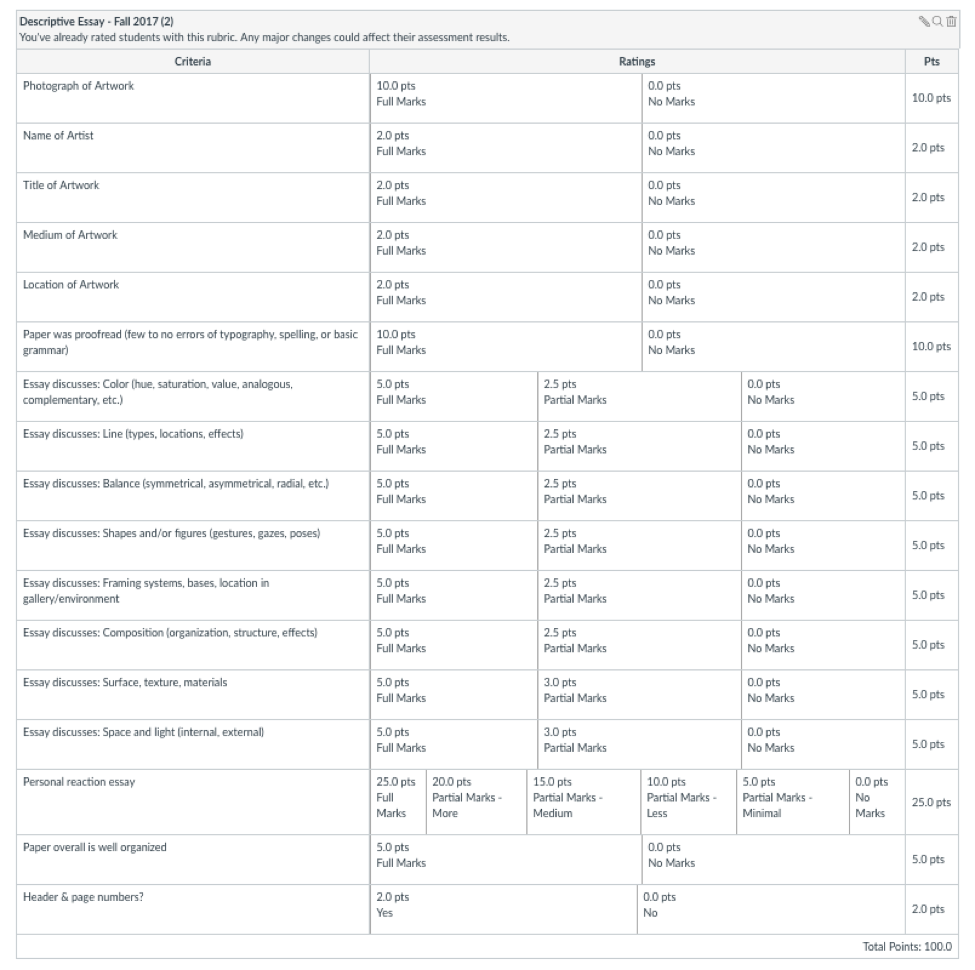

Think also about what your expectations are for each item you wish to evaluate. What will constitute full credit, partial credit, or no credit in a section? How many different levels of partial credit do you wish to have? Note that different sections of a rubric can have different point totals and different distributions of partial credit: for instance, you can make proofreading a credit/no credit item yet include five different point levels for argumentation.
Note that you can always revise your rubrics in Canvas. You cannot, however, reorder items inside a rubric once it has been created; hence the importance of planning criteria in advance.
Remember that students will see the rubric as part of the assignment. You can even direct them to the rubric as part of their assignment preparation; this is particularly helpful if you have prepared some detailed remarks to guide them (and you) in expectations.
Building a Rubric
- Open the assignment to which you wish to add a rubric, and click the “+ Rubric” button at the bottom of the assignment page.
- Give your rubric a meaningful title (E.g., Unknown Object Essay), and click “Save”
- Click the pencil for the “Description of criterion” and enter your criterion. Set the total points you wish to award for the criterion. Click the pencil to edit the points, name, and description of the different point levels. To add intermediary levels, click the blue “+” sign.
- To add the next criterion, click “+Criterion.” You will be given the option to use the criterion you have just created as the basis for the new criterion, or to create a new criterion from scratch.
- Repeat the process until you have built the rubric.
- If you want to have Canvas automatically pull points awarded via the rubric into the grade for the assignment, be sure to click the box, “Use this rubric for assignment grading.”
- Click the red box, “Create Rubric”
Copying & Customizing a Rubric
- Open the assignment into which you wish to copy an existing rubric
- Click on the “+ Add Rubric” button
- Click on the blue magnifying glass “Find a Rubric”
- A dialogue box will open, listing all of your courses at left, all the rubrics for the selected class at center, and the details of the selected rubric at right. Locate the desired rubric, scroll down to the bottom of the dialogue box, and click on “Use This Rubric.” The rubric will now appear in the assignment.
- Click on the pencil icon to edit the rubric. You can change any aspect of the rubric at this point, from the title to the total points to the categories to the point distribution to the criteria descriptions and evaluation specifics. The only thing that you cannot do is reorder items.
- If you want to have Canvas automatically pull points awarded via the rubric into the grade for the assignment, be sure to click the box, “Use this rubric for assignment grading.”
- Click the red box, “Update Rubric”
Grading with Rubrics
- Open the assignment you wish to grade
- Check your rubric settings to ensure that “Use this rubric for assignment grading” is checked
- Click on “Speedgrader” at upper right; you will be taken to the first ungraded submission
- Click “View Rubric” and adjust the overall pane and the split panes to the desired sizes
- To grade the paper, click on the relevant boxes in the rubric. They will turn green when selected and points will appear. When you have graded all categories, click “Save.” The grade will now appear and a checkmark will indicate the assignment as graded.
- If you wish to provide written comments, you may do so in the “Assignment Comments” box. You may also mark up online submissions using the commands at upper left.
- To move to the next student, click the right arrow. To move to the next ungraded submission, click the dropdown arrow next to the student’s name and move to the next name marked with a yellow circle. (Names that are greyed out have not submitted assignments; those with checkmarks next to them have already been graded.)